Wednesday 17 June 2020

Stamperia News


https://www.charmedcardsandcrafts.co.uk/acatalog/Stamperia.html

It has been a while since our last post, and a lot has happened in the world since then. I hope you are all managing to stay safe without feeling too stir crazy. It's been a strange old time for us all. A lot of people have been discovering new passions, or rediscovering old ones, such as cooking and of course crafting.  So lets move onto crafting :) Stamperia in particular.  Here at Charmed Cards & Crafts we were one of the first companies to stock the products from Stamperia, and as their product ranges continue to grow, so does our love for them.

The new releases are imminent. As always when Stamperia do a major release they do it big time! They stagger it over a few months, so products will be released periodically.  For this reason we do not offer pre-orders on the new products, but rest assured that we will get plenty of stock in and let you know as soon as we have it.

There seven main collections being released, with each collection comprising 12x12 and 8x8 papers, chipboard (two new types), die-cuts, stamps, stencils, moulds:

June/July releases:

HORTENSIA (you can see some more of  the Hortensia collection in the top banner)

https://www.charmedcardsandcrafts.co.uk/acatalog/Stamperia.html

PRINCESS


https://www.charmedcardsandcrafts.co.uk/acatalog/Stamperia.html


SWEETIE


https://www.charmedcardsandcrafts.co.uk/acatalog/Stamperia.html

LOVE STORY


https://www.charmedcardsandcrafts.co.uk/acatalog/Stamperia.html


ALICE GOLD (larger Alice pack with stunning gold accents)


https://www.charmedcardsandcrafts.co.uk/acatalog/Stamperia.html


JulyAugust releases:


WINTER TALES

https://www.charmedcardsandcrafts.co.uk/acatalog/Stamperia.html

ARCTIC ANTARCTIC


https://www.charmedcardsandcrafts.co.uk/acatalog/Stamperia.html


There are lots more releases from Stamperia, including new mixed media, I will do a post on the new resins etc when we get it in. See video presentations from them here. We will add to this area when we get more:


TUTORIALS & INFORMATION: Stamperia offer lots of tutorials on using their products. Check them out here

They also now offer more eLearning, right here at their E-Academy


FIND ALL STAMPERIA PRODUCTS IN OUR SHOP

Happy Crafting friends :)


Sunday 12 January 2020

Seaworld ATC's Using New Stamperia

It is always exciting when new paper lines are released, and none more so than from Stamperia.  One of the new paper lines - "Seaworld" - was created by the uber talented Antonis Tzandakis, who also designed Mechanical Fantasy and Azulejos for Stamperia.
 The Charmed Cards & Crafts monthly ATC swap was themed "Seaworld" and OF COURSE I just had to use the brand new papers:


 ATC's are based on a piece of cardstock measuring 2.5" x 3.5". I used a sand coloured piece in this size to emulate the sea floor,  then cut a fishnet from a fishnet die, and wrapped this around the base. 
The tags are from the Stamperia "Seaworld" 12x12 paper pack (we also have the pack in 8x8). I cut these out then glazed them with Stamperia Transparent Crackle Glaze. Once dry the paper had buckled so I adhered the tags onto dark brown cardstock, inked edges then put between heavy books for a couple of hours to ensure they were completely flat and stuck down. 
A large eyelet was inserted at the top of the tag and twine inserted. The tag was then mounted onto the fishnet base on foam tape, but using the wet Stamperia Mixed Media glue to ensure a strong hold. The bubbles and metal octopus were likewise adhere with Mixed Media glue. The chipboard sentiment is a Kaisercraft Flourish from the "Nautical" pack.


 You can see how the crackle glaze gave a 3-dimensional effect:


The papers you see below my ATC's are all from the paper pad - how amazing are they!!!  This pad definitely has the wow factor.


Here is a project created by Antonis Tzanadakis:


You can find the new Seaworld papers HERE. Soon we will have lots of coordinating products to go with them, such as stamps, stencils, rice papers and more.  Subscribe to our newsletter to get them as soon as they arrive.


Saturday 21 December 2019

Dream Garden


I have another Scrap Boys card for you today, this time using the beautiful "Dream Garden".  This is an A5 card, so quite large. Lots of fussy cutting here, those beautiful flowers are irresistible. This card uses the 12x12 collection pack, but there is a 6x6 size if you prefer.

https://www.charmedcardsandcrafts.co.uk/acatalog/Scrap-Boys-Dream-Garden-p1.html


Here is my guide to making this card:

  • Start with a white A5 card.
  • From the Dream Garden Paper DG6 cut a piece the same size as the card front (we are using the reverse of that paper here). Ink edges - I used a Tim Holtz Distress Ink.  Mix a crackle glaze with green mica powder (or ink it is up to you how you colour it) and stencil onto front of the DG6 piece.  I used a John Next Door Quatro Stars template
  • when dry adhere to the front of the card.
  • For the clock I painted a metal flower, designed to take a cabochon (we will have these on site soon), with Finnabair Opal Magic Paint, then added a Kaisercraft glass Curio (the clock) from the LadyLike collection.
  • Die-cut a window. I die-cut this twice, once with brown cardstock, and once with white, then layered it as you see. The die I used is Kaisercraft Arched Window DD404.  Attach window to the front of the card.
  • Fussy cut heaps of flowers, leaves and birds. The flowers are from DG4 and I cut the flower border from DG6 and adhered that to the bottom of the card. The birds and butterflies are cut from DG7. Attach your cut-outs so that they are elevated from the card, using foam tape etc.
  • Paint a metal key with opal magic and adhere to the bottom
  • Ink edges of a Tim Holtz chipboard sentiment (from the Idea-ology quote chip pack (everyday)) and attach on foam tape.
  • Add some pearls to finish. I also added some Prima sugar dots.
  • Fianlly decorate the inside to match if you please (I usually always do)
  • See pictures below for guidance


This clock works perfectly with the flowers:
 

Here you can see the lovely effect of the coloured crackle glaze I stencilled on:


The double layered window is a nice effect I think.


The key nestled amongst the flowers, extending the house/garden theme


The butterfly cut-outs from paper DG7 are quite lovely and that darn bird is just too cute!!

This picture shows the layers. You can also see I decorated the inside.


 Happy Crafting


Friday 20 December 2019

Industrial Romance


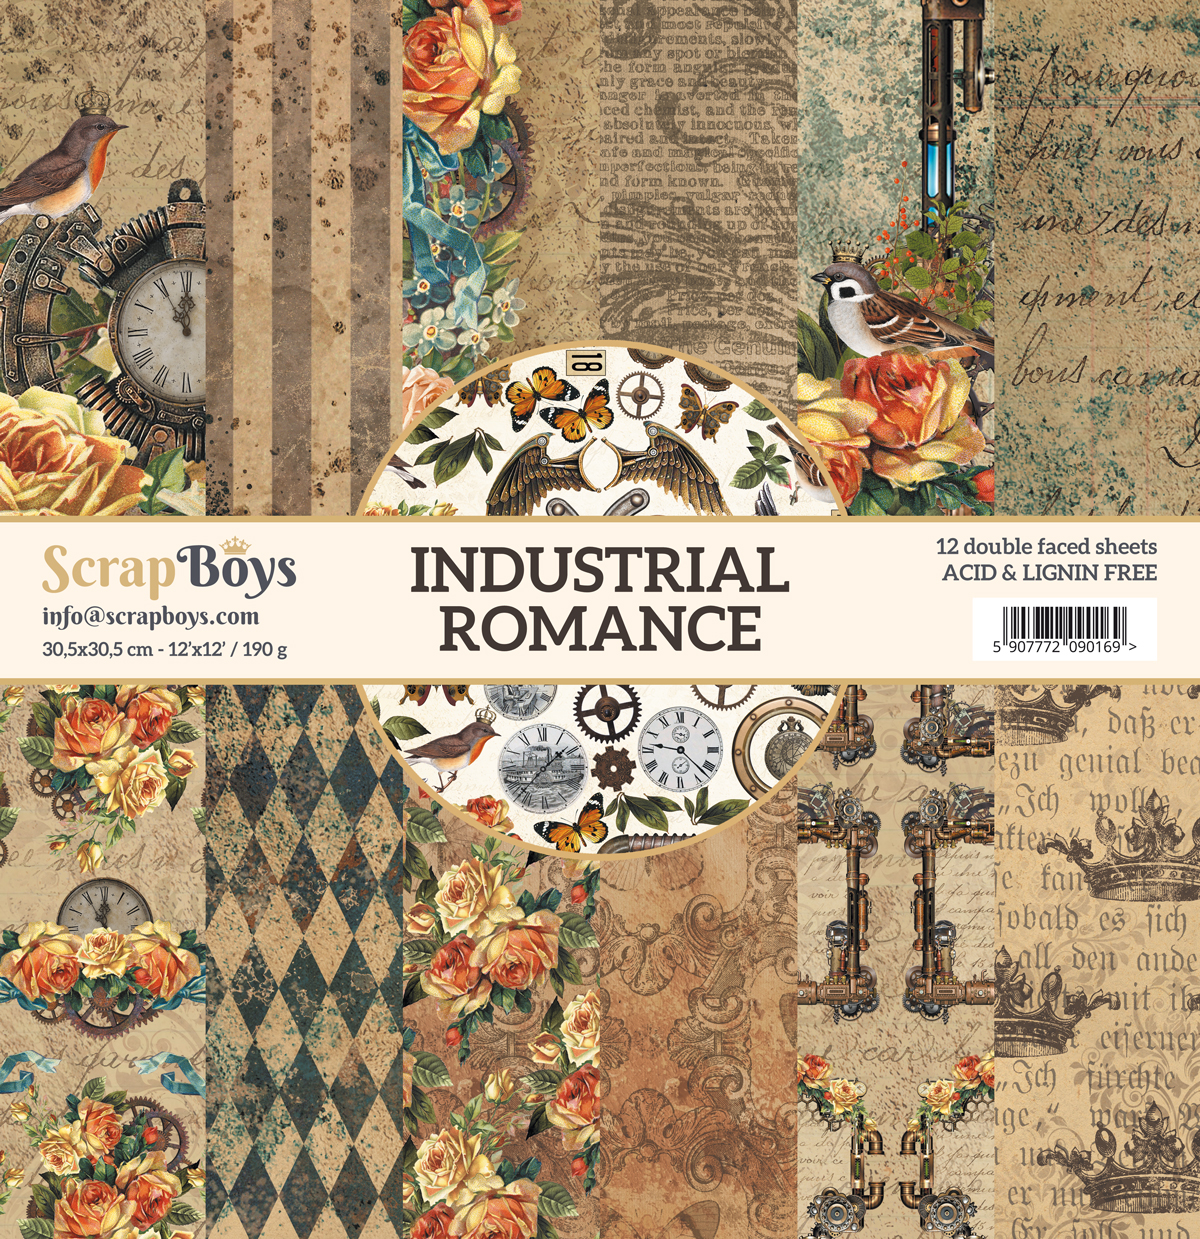
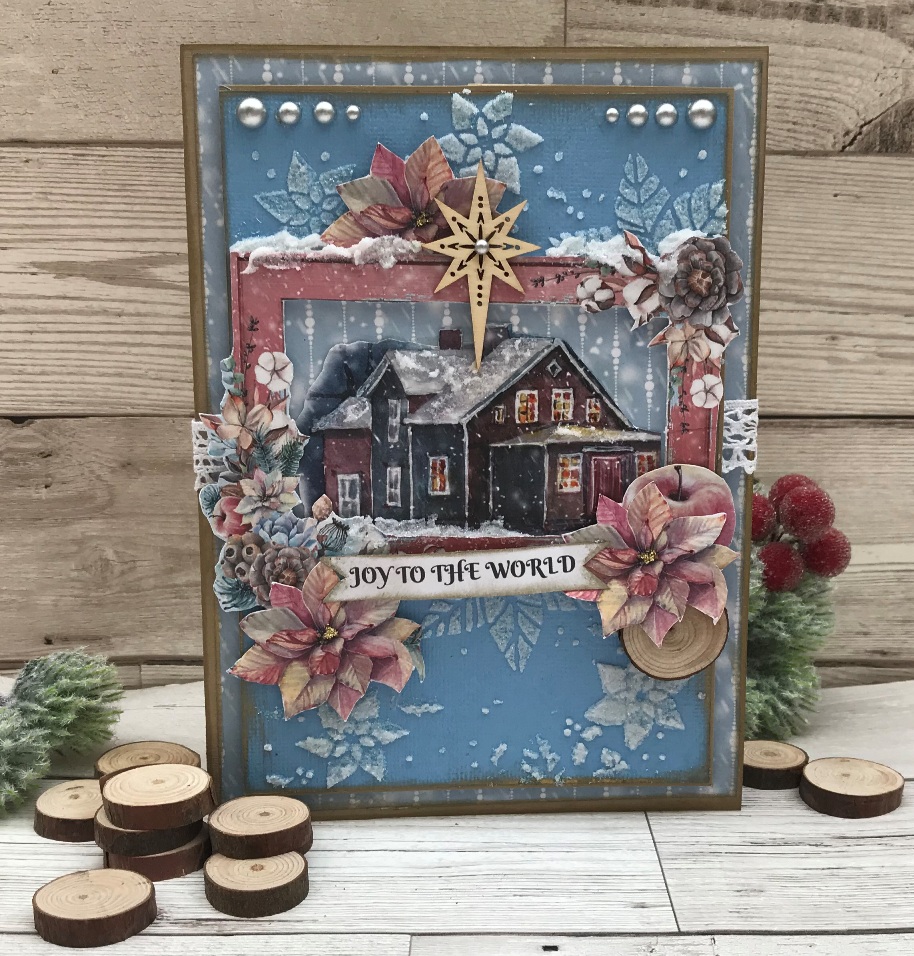
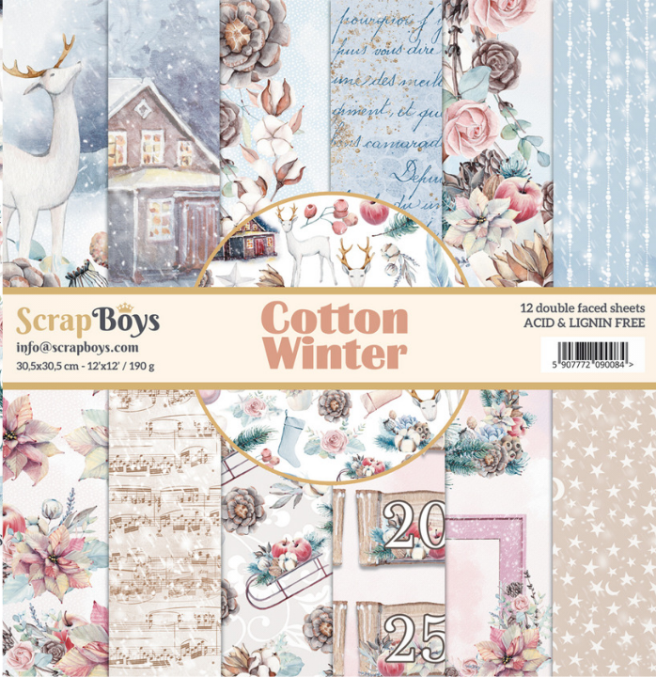
If you are a little tired of seeing Christmas projects, we are today focusing on the amazing Industrial Romance collection by Scrap Boys. The colours and imagery of the collection is right up my street, and I thoroughly enjoy creating these two cards. I used the papers in the "Industrial Romance" collection pack, but there is also a 6x6 paper pad if you prefer the smaller format.

https://www.charmedcardsandcrafts.co.uk/acatalog/Scrap-Boy-Industrial-Romance-Collection-Pack--31744.html#SID=2645


My two card follow the same format which are as follows:
  •  The cards are roughly A6 size.  I used an A4 sheet of White Linen cardstock (in stock soon) and got two cards from one sheet; so cut a piece of the cardstock measuring 21cm x 15cm and fold it into a card measuring 10.5cm x 15cm.
  • Cut a piece of Kaisercraft Marrakech cardstock slightly smaller, ink edges with metallic gold and adhere to the front of the card.
  • Cut a piece of Cappuccino coloured cardstock a bit smaller than the Marrakech (sorry I have idiotically given the cards to people so cannot give you exact measurements, but please see pictures for guidance).  Ink edges with metallic gold then stencil a diamond pattern to parts of this piece of cardstock, using Finnabair White Gold Icing Paste. Leave to dry then attach to the front of the card. We have several diamond stencils that would be perfect for this, for example: John Next Door Quatro Stars template (which I used here) John Next Door Argyle stencilKaisercraft Distressed Diamonds Template,
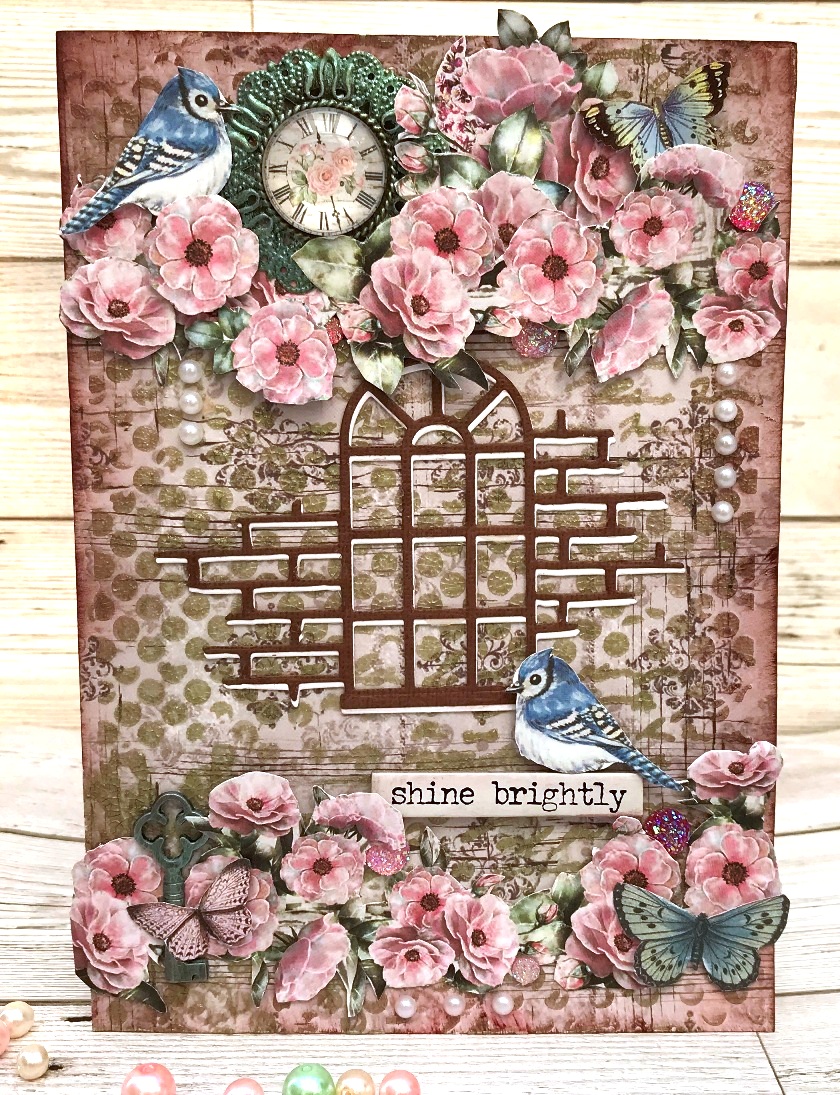
  • Cut out frames from Industrial Romance paper IR6 - one for each card. Attach to the front as shown, elevating using foam tape.
  • Fussy cut various images from IR7 and adhere them to the card as shown, elevating some on foam tape for a fabulous 3-dimensional effect.
  • I added metal cogs (we also have Kaisercraft cogs which you could paint accordingly (see suggested additions in the Industrial Romance section ), a Prima resin fairy, a pin,  and a paper rose. The rose I used was a Sonja Spray Rose
  • Cut a sentiment from the border strip on the 12x12 sheets of paper (they all have one). Distress it by gently rubbing a little ink on it then layer on Kaisercraft Marrakech cardstock and attach to the front of the card on foam tape.
  • Add a strip of Prima Lace to the bottom of the cards.  I inked the bottom as I wanted to carry on the industrial feel. 
 Please see pictures below for guidance.


Here you can see that beautiful Icing Paste stencilling.  On one card I stencilled left top/right bottom,  on the other top right/bottom left.


The circles in the centre are cut-outs. the card below has a metal cog plus a brad in the centre. Here you can also see how the front is lifted off the card by means of foam tape.


again this large circle in the centre is a cut-out, as are the butterflies and most elements on the cards.
You can see here how dimensional the Icing Paste is. I love the effect.


I hope I have encouraged you to try this amazing collection. Check out the suggested coordinated items on each of the Scrap Boys collection pages.


Happy Crafting! 


Thursday 19 December 2019

Creating with the Scrap Boys


Hi Guys,

Can't believe it's almost the big day! I hope you have joined in our daily advent give-away over on Facebook.  I thought I would show you a few Christmas cards I created with one of the new brand Scrap Boys first release "Cotton Winter". We love these papers, we have just had another three new collections, making it six collections now available (see them all here).

My first card is size A5. 


I created it as follows:
  •  Fold a piece of Cappuccino coloured card into size A5
  • Cut a piece of Cotton Winter paper CW3 into a size slightly smaller than the front of the card. Ink edges with metallic gold and adhere to front
  • Cut a piece of plain blue cardstock to mat onto the CW3 piece (see picture). Using Snowflake paste stencil the poinsettia/Snowflake pattern using Kaisercraft "Holly" template. When dry ink edges then mount onto card using foam tape.
  • Cut out the pink frame from Cotton Winter paper CW6. Cut out the inside too. Cut out the building from CW7 and mount onto a piece of CW3, then adhere behind the pink frame. 
  • Stick a piece of white lace to the middle then mount the frame piece onto the front as shown.
  • Fussycut images from various Cotton Winter paper , and adhere as pictured. Elevating some on foam pads.
  • Cut out one of the sentiments on the bottom of the Cotton Winter sheets. Ink edges attach on foam pads
  • Finish by adding snowpaste to the top of the pink frame and on some of the cut-outs
  • Add a Kaisercraft Star from the "Fancy Christmas" flourishes box.
  • Add a Tim Holtz Wood Slice 
  • Add Pearls (I used Graphic 45 Pearls


  I created a simple design inside:

The next two cards are A6 size:
 
 
 Card 1:

I created this card as follows:
  • Cut a piece of "Cappuccino" coloured plain cardstock into a card size 5.75" x 4.25". Ink edges with metallic gold. 
  • Cut out a piece of Cotton Winter Paper CW4 slightly smaller than the card front. Ink edges with metallic gold and adhere to the front.
  • Cut a piece of Kaisercraft  "Thyme" plain cardstock into size 3.5 x4.75". Ink edges. Cut a smaller piece of CW4, ink edges and adhere to the top. Cut out the relevant green frame from Cotton Winter paper CW6. Adhere a piece of cream lace ribbon around the frame then adhere to the front as show. 
  • Cut out images from various Cotton Winter papers and adhere as shown. 
  • Add snow paste to the top of the frame and on some of the cut-outs
  • Add a sentiment cut from the bottom border that is on all the Cotton Winter papers, and ink with metallic gold. Adhere to the top using foam pads to elevate the piece from the card.
  • Decorate a piece of Kaisercraft Chipboard flourish from the "Fancy Christmas" pack  with Gold Glamout Dust. Attach below the sentiment.

The second card is very similar:

Here I used Kaisercraft Chipboard flourishes from "Festive Foliage" glittered with Glamour Dust as before. Also Graphic 45 pearls.


To finish creating with Cotton Winter I made three ATC's for our monthly ATC swap - come join the group either on Facebook or on our forum:


You can find this gorgeous collection here in our shop:
https://www.charmedcardsandcrafts.co.uk/acatalog/Scrap-Boys-Cotton-Winter.html


Merry Christmas Everyone